
It’s time to unleash your inner artist! Everybody likes to play with finger paints and potato stamps – even grownups!
I propose we all send finger paint and stamp art to our adult kids and act all disappointed if they don’t put it on their fridge. Pay back!
Here’s a fun, fast and frugal project for a lazy afternoon. Gather the kiddies and make memories … and a mess. All kids know if it’s not messy, it’s not fun.
Little Diva’s Finger Paint
Yield: 1 cup Time: 5 minutes
What You’ll Need:
- ½ cup white flour
- ½ cup cold water
- Food coloring
Here’s How:
In a small bowl, mix the flour and the water together until smooth. This is s good job for kiddies. Divide the mixture into small containers (paper cups work well) and add the food coloring of your choice to create beautiful colors.
That’s it!
This paint is very thick so it works best on heavy paper, construction paper, even paper plates. The thick texture makes it perfect for finger painting, brushing or stamping.
The paint is completely edible so even very little ones can enjoy playing. Finger painting is an excellent sensory activity for toddlers and the art they create is priceless.
Stain alert
Food coloring can stain fabric and carpet and light colored pets. Keep this contained to easy to clean areas. Can’t say I didn’t warn you.
As an option you can add glitter and make sparkly paint but then be watchful that the little kiddley-boos or pets don’t eat any. That would be bad. Pretty. But bad.

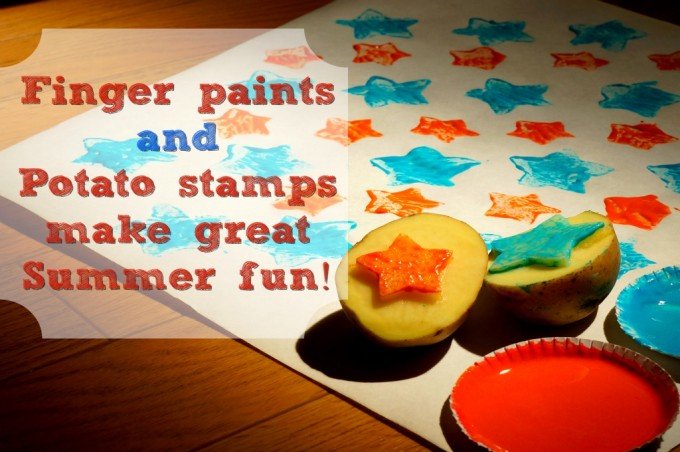
Potato Stamps
To make potato stamps you’ll need to sacrifice a potato or two. Choose large ones to offer enough surface area for your stamp design once the potato is cut in half.
You can go old school and carve a design freehand with a sharp knife (not a job for the kiddies!). Start by drawing your design on the surface of the potato with a marker then carve around the design with the tip of your knife removing the excess potato as you go.
I find a better idea is to use a cookie cutter. I like this better because it’s much easier and you can make more intricate designs. Press the cookie cutter into the potato and use a sharp knife to cut around the cookie cutter about a quarter to half an inch down the potato. Remove the excess potato then remove the cookie cutter. See? Easy peasy.
It’s best to apply the paint to the stamp with a brush or fingers rather than dipping the stamp in this very thick paint.
What can I make with my fabulous paint and stamps? Glad you asked!
- You can make greeting cards by folding pieces of card stock or index cards in half.
- You can also make one-of-a-kind wrapping paper for a very special gift.
- Or you can just enjoy making art for art’s sake.
“The object isn’t to make art, it’s to be in that wonderful state which makes art inevitable.”
~Robert Henri

LIL' DIVA'S FINGER PAINT AND POTATO STAMPS
Materials
For paint
- ½ cup white flour
- ½ cup cold water
- Food coloring
For potato stamp
- a couple of potatoes
Instructions
To make paint
- In a small bowl, mix the flour and the water together until smooth. This is s good job for kiddies.
- Divide the mixture into small containers (paper cups work well) and add the food coloring of your choice to create beautiful colors.
To make potato stamps
- You can go old school and carve a design freehand with a sharp knife (not a job for the kiddies!). Start by cutting your potato in half. Draw your design on the surface of the potato with a marker then carve around the design with the tip of your knife removing the excess potato as you go.
- I find it easier to use a cookie cutter. Press the cookie cutter into the potato and use a sharp knife to cut around the cookie cutter about a quarter to half an inch down the potato. Remove the excess potato then remove the cookie cutter.
Playtime!
- It’s best to apply the paint to the stamp with a brush or fingers rather than dipping the stamp in this very thick paint.
Notes
You may also like – Nothing says “I Love You” Like Slime Can You Send Happiness Through the Mail? Yes, You Can!